|
There are currently no product reviews.
 ;
The Manual was perfect.
The deliverie was perfect.
Thanks
;
Found website easy to use and manual very clear. First class service
 ;
The quality is quite good and clear. Nothing of the informations inside is lost during the digitalizing process
;
Very good service, fast downloads and good manuals.
;
Good qulity. Even as it is an old manual (from 1991-1992) it has a good scanned quality and is complete, including user's manual, disassembly intructions, diagrams and schematics, ajustments, troubleshooting and parts list, as usual with SONY manuals and Owner-manuals service.
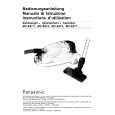
(4) Remove Front Frame
Remove 3 screws(l),then be careful not to be damaged the face of front filter. Attached the Stand with 4screw(a), then stand it vertically. When remove front frame.
F���� F���� Front Frame
Screw (�) S�������
S������� Screw (�)
Filter holder Screw(m) metal ï¼³ï½�ï½�ï½�ï½�ï¼�ï½�ï¼� ï¼ï½�ï½�ï½�â��ï½�ï½�ï½�ï½�ï½� Screw(m) ï¼³ï½�ï½�ï½�ï½�ï¼�ï½�ï¼�
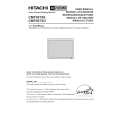
(5) Remove Front Filter(Glass)
Remove 22 screws(m), and remove Filter hold Metal and Front Filter. Be careful not to fall down the front Filter. When remove the filter hold Metal. When attach the new Front Filter, remove protection film on a side(yellow tag is marked).Then attach to the Front Frame, locating the conducting electrode side to the inside, and attach Filter hold Metal.
Screw(m) S������� Front Filter (Glass) F�����F������G�����
Screw(m) S�������
Screw(m) S�������
S�������
Screw(m)
9
|